How To Slow Down Your Tape Deckby Vic Cheney
|
The SGF Store Strings & instruction for lap steel, Hawaiian and pedal steel guitars SteelGuitarShopper.com |
|||||||||||||||||||||||
Introduction:When you try to learn music from a recording, it is often hard to hear everything because it is going too fast. It really helps to slow the music down. I used to do this with a record player, and put it on 16 speed. It is then real slow, an octave lower, and a bit differnt in tone. Nowadays it is very difficult to find a record player, let alone one with a 16 speed. Some tape decks have a speed control, although on many it is more a matter of fine tuning, rather than slowing stuff as slow as half speed. Most decks have no such adjustment, so this is an easy method to control the speed all you want. This works using an adjustable voltage regulator to slow down the motor of your tape deck. It takes about 5 parts that cost about $10-15 at Radio Shack. If you can cut wire, solder, and follow a simple diagram, you can do this. Then you can learn stuff off of tapes very easily. If you slow it down to half speed it comes out an octave lower, but the real trick is to use a pitch transposer. With the pitch boosted to normal, you can hear the notes much better. This is a function of many of the modern mutiple effects units (ART, Pro-Fex, etc.). I like to slow down the real fast stuff a whole octave, then boost the pitch back to normal. Moderate speeds I might only slow it 6 or 8 frets' worth. After I learn it a little, slow it just 3 or 4 frets worth to practice it at a more reasonable speed, but still made a little easier. Later, full speed is a piece of cake. Is it risky to your tape deck?If you can't strip the end of a piece of wire and the solder it to somewhere based on a simple circuit, get some help. Otherwise, you should be fine. This device doesn't do anything but reduce the voltage getting to the motor of your tape deck. If you wire it wrong then it won't work, but is not likely to hurt anything. It is important to put in a switch, so that you can cut the speed control out and return to having your tape deck in its usual mode. You may have to switch it off for rewind and fast forward.
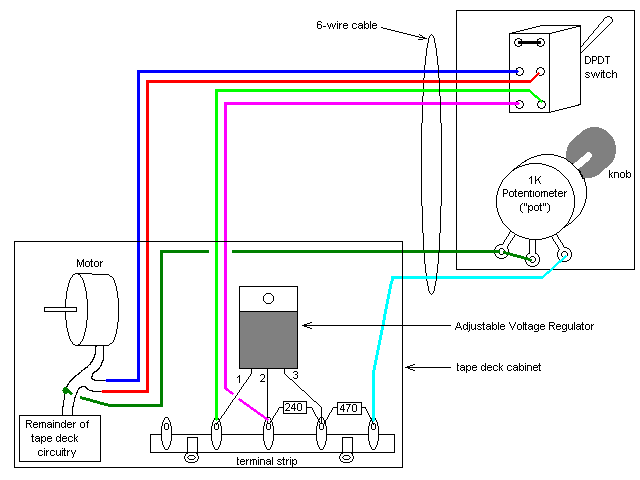
The Details:First, get the Adjustable Voltage Regulator from RadioShack (part #276-1778). There is a circuit diagram on the package that will work OK, But I have made a few changes that makes it easier to work for a tape deck motor. The 5K potentiometer (pot) the package recommends covers too great of a range, and leaves you with with a narrow litlle area of the knob's turn to adjust the speed. Put the 470 ohm resistor in series with a 1K (linear taper) pot and you get a lot more control. I prefer the deluxe version: get a 1K 10-turn pot (small size), and then get a little dial counter that counts the turns, and has markings down to 1/100 of a turn. This will add $40 to the cost, but the pot makes it real easy to fine tune the speed, and the knob-with-counter makes it easy to return to the same settings. The capacitors are not really necessary, since you are already working with smooth, filtered DC. I put most of the parts on a little terminal strip inside the deck. Get 2 feet of 6-wire cable, and run it from the terminal strip inside the deck to the pot and switch ouside the deck. (Or, just use 6 pieces of hook-up wire.) That way you can get a tiny little chassis box, and fasten it to the side of your deck. Then you'll have the on-off switch and the speed knob right where you can get to it. Or keep it ultra-simple: use a regular ol' pot, and mount the switch and pot on the back panel of the tape deck, and then just reach around. The trickiest part is connecting it to the inside of your tape deck. You have to find the two wires that go to the motor. One of the wires will be the positive, and the other the negative (and may be grounded). If you only see one wire going to the motor, the other conductor is ground (the chassis of the deck.) You need one wire going from the negative to the little speed control circuit. The positive lead you have to cut, and lead a wire from each of the cut ends to the switch. (Don't worry, when the switch is off, the motor is connected back into the deck "just like old times".) The last one I did was a dubbing tape deck. It had four wires leading to the motor. I figured that the red one was the positive, and cut that one. I couldn't figure out which one of the others was the negative, so I ended up trying them all. When you get the wrong one, it doesn't work when you throw the switch. That's all. It finally worked when I used the yellow one, and not only does it allow me to slow down the tapes, but also to speed them up as well. It may take some trial and effort with your particular deck. It is well worth it. If you do it to a dubbing (double) tape deck, you want to be sure to use the "play" deck (so you can record to a full speed tape for easy playback later). If you have a voltmeter available, it will make your job easier to fing the right wires the first time. It will maybe save some time in trial and error. Once you can slow tapes down, it is real nice to be able to boost the pitch back to normal. An effects processor that has pitch transposing capabilities works great. You just run the output of your tape deck through it and out to your stereo. There are abundant adapters for the plugs to make this easy. I find slowing stuff down and then boosting the pitch back up to be so valuable, that it is worthwhile for just that reason to get one of these effects units. In addition, the abiliities to make nice sounds on stage (reverbs, digital delays, equalization, other stuff) increase your enjoyment of playing. Look at the circuit diagram, and also look at the picture I have drawn of the components. If you have trouble, you may write to chaney@community.net Of course, I cannot control your renovation efforts, and cannot be held responsible for what happens to your tape deck. If the circuit diagram and picture diagram look like Chinese to you, you shouldn't be attempting this project without help. I sincerely believe that if you can do the soldering properly, there is almost no chance of hurting your deck, it is easy and cheap, and will make learning music off of tapes MUCH EASIER.
You can get all you need at Radio Shack for the basic version, but your local electronics parts store will have the optional parts like the fancy pot or the counting dial. This little gadget has been my solution to helping to learn music off of recordings. If anyone has a different solution, or variations on my efforts, I would love to hear about it. Please let me know. Vic Chaney, chaneyv4@sbcglobal.net
Copyright ©1997 by Vic Cheney |